Seed Giveaway Contest #2 Winner

Thank you to all who followed my blog and commented on the  Seed Giveaway Contest#2.

The winner, who was randomly picked is — Clare M. Congratulations! Your packets of seeds will be on their way as soon I get an address to send it to!

I have not been good about doing giveaways, but I hope to put something up once cooler weather hits!

Plant Seeds Giveaway – just 2 days left!

Contest ends this Friday, 3.21.2014

Just two days left for you to follow the blog and get one entry to be in the drawing to win the 11 packets of seeds.’

If you comment in addition, you get a second entry.

Already follow? Just comment and let me know! 

Go for it!

Seed starting ideas

Have you the urge to start seeds indoors but decided against it because you didn’t want to purchase seed starting kits? Despair not! You have plenty of material that you can use to start seeds in your own home. Egg cartons (plastic and recycled paper), those clear little plastic boxes berries come in, plastic bottles (smaller ones are better than larger ones for starting), old plastic Tupperware, styrofoam boxes, ice trays, toilet paper rolls (yes, you read that right!), plastic baggies (if you have a way to contain them from falling over), small store-bought yogurt cups, small paper cups  and pretty much anything you can punch a hole in all work well! Here is what I have this year.

1. Plastic Bottles

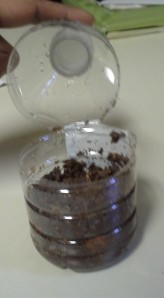
Cut Bottle

I was at a presentation that my city had for home gardeners on “Sustainable Vegetable Gardening” earlier this week and the speaker passed around this bottle that he had used to start his cucumber plants. I decided to try the idea myself. Take a clean bottle. Remove the label. Cut the top half with a knife, but only cut about 90% of the way around the bottle. The remaining 10% serves as hinge. Open at the hinge and fill with potting soil. Moisten and put in your seeds. Close at hinge and tape the cut portions completely shut with a clear tape. A perfect greenhouse that can be watered from the lid should it get dry. If you have put in too much water, blot out with a a towel or don’t tape the hinge back together until it is dried out. I like to use a heavy permanent marker to label the seed type and date of planting. This year, I have okra starting in my water bottles.

2. Egg Cartons

Egg Carton Starter

Carton Seed starter with Basil varieties

I have a few egg cartons saved to pass on to my local chicken farmer. I decided to try the plastic ones this year as they can be closed to serve as a greenhouse. The recycled paper ones would work as well, but they will need to be kept open, have plastic wrap on them to serve as a greenhouse if you want them closed and need to be watered more often, so I decided against them this year. Much easier than using a plastic bottle as there is no cutting involved. Just scoop in some potting soil, moisten and pop in a few seeds. Cover to keep moist or keep open if too wet! I think these would work for more delicate seeds, so I have 3 varieties of Basil starting in them. Just to try a larger seed, I also have some Armenian Cucumbers starting in them.

Seed Starters

The starters I have so far.

3. Toilet Roll
I was looking around to find some interesting ways to start seeds and found this post on how exactly to use toilet roll tubes to start seeds. YouGrowGirl has a step-by-step method showing you how to use them. These work like jiffy pots in that you grow in them, and plant them, roll and all, directly into the soil. Biodegradable “pots” which also condition your soil as they break down as well as a way to reuse those toilet roll centers!

4. Various plastic containers
Plastic tubs, berry plastic containers with lids, plastic cups etc. can all be used to start your seeds in. Poke a few drainage holes in the bottom if they are not a clear plastic, fill with some potting soil and put in your seeds. Put in some skewers or popsicle sticks and wrap clear plastic wrap over and above to provide a greenhouse and reduce watering.

Of course, all of these require that your seeds are started under adequate light – a window suffices just nicely or a sunroom when it is above freezing but not yet warm enough to put out your seeds; have adequate moisture (Too wet? Fungus. Too dry? Won’t germinate.) and adequate food (if your soil is fresh and has organic matter, you should be okay for the 3-5 weeks you are going to keep your seedlings in the starters). Your seedlings are ready for a transplant when the roots have filled out, but have not completely taken over the container. I like to keep my open seedling containers in the outdoors a few days before I transplant them, just to “harden” them off and prevent transplant shock from the warm, cozy home to the tough outdoors!

Happy Gardening…may your dreams of plentiful harvest come true!

Mixed Veg Pickle

Had some at a party earlier this month and wanted to recreate it. Wasn’t quite the same to look at nor did it taste the same. Still needs to be tweaked some, but here is the recipe:

  • Peel and cut into 2″ lengths and about as thin as a pencil or so, one or more of carrots, radish, turnip and cauliflower to total 500 gms. Keep cauliflower separate from other vegs.
  • Toss in upto 50 gms of green chillies, a few cloves of garlic (cut if too large), lotus root etc.or leave this section of ingredients out if you don’t want them
  • 25 gms jaggery chopped fine
  • 50 gms coarsely ground mustard seed (brown is better than black, but either is fine)
  • 10-15 gms red chilli powder
  • 1 tsp turmeric powder
  • salt to taste (about 4 heaping teaspoons)
  • 30 mls oil (I used canola, but you can use mustard as well)
  • a dash each of asafoetida and fenugreek powders
  • about 30-40 mls of fresh lemon juice or white vinegar

Bring to boil about 500 mls of water with a tsp of turmeric and 2 tsps of salt.

Add the sticks of carrot, turnip and/or radish. Cook on a simmer for 2 minutes. Drain the vegs and lay on towels (or in the sun) to dry while getting the rest ready. They need to be crisp but tender.

Put cauliflower, chillies, garlic and lotus stem (whichever of these you use) into the same boiling water for 2 minutes, drain and lay out to dry.

Heat oil, adding more if you prefer. Add the coarsely ground mustard when hot, stir to mix and toss in all the vegetables. Cook a minute or so while stirring often. Add the jaggery, salt, chilli powder, asafoetida and fenugreek. Stir for a few minutes until most of the liquid has evaporated. Let cool in the cooking utensil. Pour into clean jars, let cool completely, and refrigerate.

I assume it will last for 2-4 weeks. If it doesn’t, then next time, I will double the oil and add a bit more salt to it.

Somehow, the one purchased from the restaurant was red in gravy. Mine has more of a brownish tint to it, which makes me wonder if they add anything to enhance the color!

Toxic summer cosmetics?

So, summer is here. The beach, the park, the water park, the pool, outdoor games, gardening etc. What do these all have in common?

The SUN!

Okay, now what comes with the sun? All those warm rays that many like to soak up, and some of us don’t but have to anyway! What is in those rays? UVA and UVB (ultraviolet rays, those pesky skin cancer causing rays that are a part of the Electro Magnetic Spectrum which provides us with other useful “stuff” like visible light, radio waves, microwaves, X-rays etc.).

So, to reduce the chances of getting skin cancer and ending up with wrinkly, leathery skin, we slather on oodles of sunscreen. What’s wrong with sunscreen you ask? Well, depending on the type of sunscreen you use, looks like the chances of reducing cancer is not really real.

Most people probably follow the basic rules of using sunscreen as shown at the Skincancer website. The times that we have used products, we try to buy ones with fewer ingredients, but last year, new rules were put out by the FDA regarding sunscreen so I decided to do some more research into sunscreens and here is what I’ve found:

  • Cancer rates have tripled over the last 35 years
  • FDA doesn’t have stringent guidelines for cosmetics as they do for drugs
  • FDA rules are outdated (the wheels at most Federal agencies seem to grind oh-so-slowly!)
  • Most sunscreens contain toxic ingredients like Vitamin A (surprise!) listed as retinol or retinyl anything, oxybenzone and  nano-particles (used to reduce that white sunscreen look)
  • Fragrances are either toxic or increase allergies (we should all know this from years of hearing about it)
  • Bigger is not always better – at least not when it relates to SPF numbers!

Here are some brands that have a lower level of toxicity – Badger has 13 products, All Terrain has 6 products, Coppertone has 4 products, Aubrey Organics and Nature’s Gate have 3 products each and Burt’s Bees and Jason Naturals have 1 product each. I stopped off at my large national chain grocery store today, and found exactly 1 product that fit the description (but, I will admit that I randomly picked up only about 15 items).

The Environmental Working Group (I am leery of the ulterior motives of sites strongly for or against something especially when they are labelled environmental, but still decided to use them as they have been quoted everywhere; I’d like to think there was some grain of truth to it) has done product reviews for the last seven or so years and every year they come up with recommendations. Before you head out on that beach vacation, at least take a quick peek at their site and find some relatively less toxic sunscreens.

Enjoy your summer vacation, use a decent sunscreen, wear UPF clothing  (similar to SPF but it’s the moniker for clothes) if possible to the beach, cover up with a hat, get that Vitamin D your body so needs and have a wonderful time!

NB: I get no kickback from anyone for mentioning their sites or products. Opinions stated are my own based on what  have found online.
Some Site Viewers: